First Generation Nissan Xterra Forums (2000-2004)


  #1  
Old 08-08-2009, 06:49 PM
dezurtrat's Avatar
dezurtrat dezurtrat is offline
Senior Member
2008 Solar Yellow Xterra OR
 
Join Date: Jul 2009
Location: Tucson, AZ
Posts: 366
Default How-to: Blower Motor Replacement

Easy (anyone can do it and basic hand tools needed)

Blower Motor Replacement How To
I changed the blower resistor after it blew but a week later it blew again so I did some troubleshooting and all seemed OK so I suspected the blower motor bearing going. There was a very noticeable difference in the friction of the bearings between the old and new. The old one stopped immediately upon giving it a spin but the new one spun freely with ease.

Basically here are the steps to change the blower motor:

Tools Needed
#2 Philips Screwdriver

1) Remove Glove Box (4 screws in corners plus 2 on latch plate)
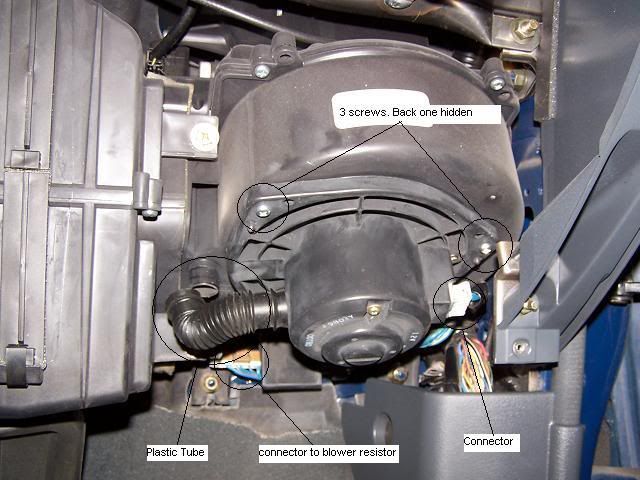
2) Remove plastic power connector to blower motor located on right side of blower
3) Remove Plastic tube located on left side of Blower (New tube came with new Blower)
4) Remove three screws holding in blower motor and be careful not to drop screw on right side down into body like I did (#8 - ½” from your favorite hardware store). Motor will now drop down
5) Install new motor with the three screws.
6) Re-Attach plastic tube on left
7) Re-Attach power connector on right
8) Install Glove Box
9) Start Vehicle and test blower on all speeds

Blower Motor


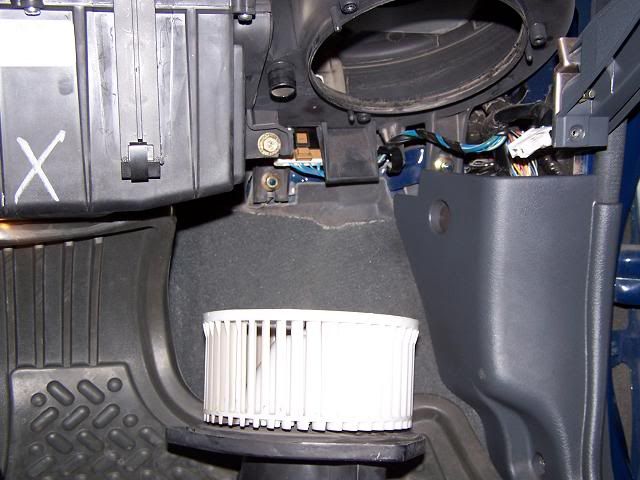
Blower Motor Removed


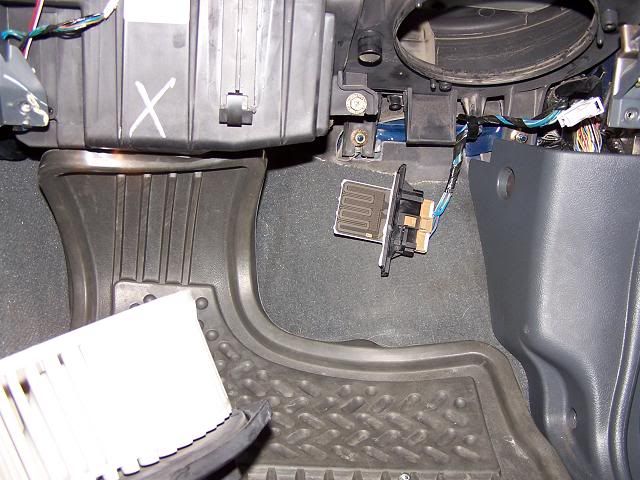
Blower Motor Resistor
__________________
Back to the Next Gen Future - "Diffs, you better hope we don't need Diffs where we are going"

Last edited by dezurtrat; 02-19-2012 at 03:56 PM..
Reply With Quote
  #2  
Old 08-09-2009, 09:48 AM
RIXterra's Avatar
RIXterra RIXterra is offline
Senior Member
2002 Super Black Xterra SE
 
Join Date: Jun 2009
Location: R.I.
Posts: 230
Default

Nice right up..
Reply With Quote
  #3  
Old 06-14-2010, 02:50 PM
BC Xterra BC Xterra is offline
Noobie
 
Join Date: Jun 2010
Posts: 2
Default Great Write Up!

My issue stemmed from the Blower Resistor rather than the Blower Motor.

But this posting had it all laid out so clearly with the pictures and everything that it made my job easier.

It will take you a bit more than 5 mins...more like half-an-hour. It's just all the damn screws you have to take out.

1. When you lower the Blower Motor (as perfectly described by DEZURTRAT), then you need to get at the Blower Resistor.

2. Undo the first screw that you see in front of you on your existing Blower Resistor.

3. Get a small mirror and see where the rear screw is. It helps to set your screwdriver on the screw while you are holding the mirror just so you get it spot on. It will be a little awkward but it works.

4. Once the entire unit comes down, you will need to remove the electrical connection (it is a beige colour as seen in the photo by DEZURTRAT).

5. Take your new Resistor (probably black) and insert the electrical connection into it. I really had to struggle here to get it to fit but it did eventually.

6. Now just do everything in reverse and you should be good to go.

The pictures from the previous post will make your life so much easier. I am just posting this to point out the specifics when it comes to removing and changing your Blower Resistor.
Reply With Quote
  #4  
Old 06-14-2010, 02:53 PM
BC Xterra BC Xterra is offline
Noobie
 
Join Date: Jun 2010
Posts: 2
Default

P.S.

Nissan wanted 180 for labour charges alone.

My local garage wanted 75 then additional for the Blower Resistor and an appointment for next week.

That's when I took it on myself.

Did the entire thing in just under 30 mins and only spent 20 bucks on the new Blower Resistor.

(That's 20 bucks here in Canada...not sure what the US price is for the same part).
Reply With Quote
  #5  
Old 06-14-2010, 11:48 PM
dezurtrat's Avatar
dezurtrat dezurtrat is offline
Senior Member
2008 Solar Yellow Xterra OR
 
Join Date: Jul 2009
Location: Tucson, AZ
Posts: 366
Default

If you're patient and take your time, you can even get at the blower resistor without removing the blower motor but it can be a slight PITA! :-)
Reply With Quote
  #6  
Old 06-27-2010, 01:34 PM
Blacktruth Blacktruth is offline
Noobie
2000
 
Join Date: Jun 2010
Location: S.I N.Y.
Posts: 5
Default

It took me 30 min and 24 buck was so EZ
Reply With Quote
  #7  
Old 06-29-2010, 03:23 PM
dezurtrat's Avatar
dezurtrat dezurtrat is offline
Senior Member
2008 Solar Yellow Xterra OR
 
Join Date: Jul 2009
Location: Tucson, AZ
Posts: 366
Default

Nice!
Posted via Mobile Device
Reply With Quote
  #8  
Old 09-18-2011, 10:46 PM
justin44 justin44 is offline
Noobie
 
Join Date: Jul 2010
Posts: 1
Default only takes 2 minutes

I have a 2001 xterra. I was able to replace the blower resistor in 2 minutes.
You dont need to unscrew or remove the glove compartment. You can see the blower housing easily. Just remove the 2 screws on the housing, take out the old resistor, put in new resistor. test. replace the 2 screws and you are done.


soooooo easy.
Justin
Reply With Quote
  #9  
Old 02-19-2012, 03:56 PM
dezurtrat's Avatar
dezurtrat dezurtrat is offline
Senior Member
2008 Solar Yellow Xterra OR
 
Join Date: Jul 2009
Location: Tucson, AZ
Posts: 366
Default

Links Fixed
Reply With Quote
Reply

  First Generation Nissan Xterra Forums (2000-2004) > Xterra Tech Topics > How-to's

Thread Tools
Display Modes

Posting Rules
You may not post new threads
You may not post replies
You may not post attachments
You may not edit your posts

BB code is On
Smilies are On
[IMG] code is On
HTML code is Off


All times are GMT -4. The time now is 02:21 PM.
Powered by vBulletin® Version 3.8.8
Copyright ©2000 - 2024, vBulletin Solutions, Inc.
Copyright ©2009-2011, www.thexterra.org
The Nissan names, logos and slogans are registered trademarks of Nissan Motor Co. Ltd and is no way affiliated with this site.
All posts are the property of the posters and are not the responsibility of thexterra.org, it's affiliates, web hosts or associated companies.